 This convenient/bilingual sign is found, literally at the front of the exit gates to Takaosanguchi station, so you can't miss it. It's about 20 feet tall or so and is brightly coloured.
The map shows 7 different paths that you can take to get to the summit. Path 1 is probably the most common, as it is the nice, mostly paved path to the top of the mountain. As you near the summit, there is less and less pavement, but the path is mostly smooth. Paths 6 and 7 offer scenic hikes through cedar forests, a laked area, and some 'slippery' valley and rock areas. We chose path 1 since it was half paved, and I figured the one most likely to be the most gentle to my walking sandals. We'll have to come another time to try out paths 5, 6, 7, but for those routes I will bring my hiking shoes as most of the path is dirt road and in spots, it's described as 'rustic'. I always become a little wary when I see the word 'rustic'. Below is the entrance to the path 1.
 About 5 minutes into the hike, we found some wild strawberries. They were difficult to spot as they very tiny, about the size of my thumbnail. But they were there under some taller grasses and large leafs. We didn't taste them, but it made me want to be on the look out for more at a better angle for photos. Because we kept looking down for other hidden forest and mountain flora, we ended up finding some not so hidden fauna instead. The caterpillar below was on the ground when we found him. I didn't place him for ease of photo taking, but the little guy most likely chewed off the end of his leaf stem and came crashing down. In the photo below, he is traversing from one end of the stem to the other. Upon taking the closest photo I could with the limited capability of my lens, my husband promptly placed the caterpillar on a large frond in the bushes beside the pathway. Since it was a nice Saturday afternoon, with little likelihood of rain, it would seem that there would be dozens of hikers coming after us. I was very concerned that he might get squashed on the heavily used pathway. Even though caterpillar squashings are probably a common occurrence in nature, I hated the thought of poor Blue Patches getting ... well squashed. So we put it out of harm's way as best we could. However, having once put himself in that predicament through his own eating habits, I suspected that our efforts to save poor Blue Patches might have been in vain.
 The first 1.3 km up is the steepest portion of the hike. I had to stop and stretch out my back leg muscles a few times. I was glad I did, as later that week, my husband complained of some sore leg muscles while mine felt normal. As you approach the 2.5 km threshold, the path becomes a little flatter and you see the end points of the chair lift and a little further down, the cable car.
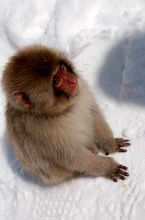
Enroute to the top, you also pass the Saru Zoo (monkey zoo), a temple and a shrine, as well as numerous refreshment stands. We stopped at none of these as we had a bottle of water that we purchased from the vending machines just outside the train station. I was so glad that we had them because the start of July is near the start of 'mushiatsui' season. It's hot and humid everyday. That day, the temperature was only 26 C but probably felt like about 30 C. I think we emptied out our bottles just past the temple with about 15 minutes to go to reach the top. Walking through this tourist heavy section of the mountain was actually nice. The terrain was mostly flat, lots of roadside vendors in case you wanted to get that authentic mountain omiyage, and lots of tall trees providing shade. Also, enroute to the temple, there were lots of stairs, latterns, and interesting photo opportunities. Below is one of the walls of Japanese writing done on thin strips of wood. As you can see the wall continues onward, following the curve of the road. I didn't stop to try to decipher the writing as there were just too many kanji characters that I could not read, but I found the wall to be so interesting. Another day when I don't have my husband in tow, I will examine that wall of writing more closely. I took about 5 different shots at various angles and was most satisfied with this one.
 When we reached the summit, there were shops, restaurants and an information & activity centre. We visited none of these places, although I did contemplate buying a bamboo carved walking stick for the hike down. They are about 500 to 700 yen depending on the height, or style. I did see a few more expensive ones, but the simple bamboo one with curving handle looked more like an authentic mountain walking stick to me. In the end, I didn't buy one since I knew that we were going to take one of the rides back down to the ground (only the last third of the hike). They were plenty of people also having a picnic at the top. Although there were plenty of public seating areas, these were all taken and most people brought their blanket or tarp to sit on while they enjoyed the cooler mountain air and the views. On this day, the sky was overcast, so the views weren't spectacular from the top of the mountain. And, no, you really couldn't see Fujisan today as I could hear many disappointed Japanese people chatting amongst themselves and agreeing how it was such a shame. Zannen ne? I took a few photos from the top but wasn't really happy with the dull skies. So here is one from a lookout point between the shrine and the temple that I was happier with. Skies are still overcast, but I like the framework better.
 In total it took us about 1 hour 45 minutes to reach the summit. The signboard in front of the train station says route 1 takes about 1 hour 20 minutes, so it's not a bad time, all photos considered. At the summit we spent only a short while, not more than 15 minutes. The restaurants were all packed and we didn't bring a picnic lunch. This then formed the basis of the reason we wanted to take the cable car down to the bottom; our energy was waning. We hadn't had lunch yet and the hiking was actually quite tiring. On the return trip down, the first ride you pass is the cable car, with signs indicating in English that the chair lift is another 3-5 minutes along the path. Being as tired and as a hungry as we were, we thought, 'okay, we're here now, let's do the cable car.' But as it turns out, the cable car only leaves once every 15 minutes and looks to hold about 40 or so people. The current one was full. There was already a lone lineup for the next cable car ride down. So we decided to take our chances with the chair lift as there is one that leaves every 30 seconds. We headed to the chairlift ride and purchased our tickets from a vending machine for about 470 yen per person. It was only after I had purchased the single-use chairlift tickets and after we had entered the lineup that I then only noticed that the chairlifts did not have the safety bar keeping you in the chair. This safety bar has been present in all other chairlifts I have ever ridden on --- in North America and in Europe. I'm afraid of heights, so this no safety bar thing kind of scared me. As we waited our turn in the lineup, the initial chairlifts coming into the station were empty, but then we saw an older ojiisan/obaasan couple hop off, followed shortly by a pair of gaijin youths. I figured if they managed to stay on the chair without the safety bar, then we could survive too. A few minutes later, we were sitting in the chairlift and on our way down. Initially, the slope is gentle and the ground is only about 6-8 feet below your feet. So we laughed over our initial fears. However, later, there are portions of the lift, that rise way above the ground. In these parts, they have placed a mesh cast with wooden boards, so it would seem that the ground is still only 6-8 feet below your feet. Unfortunately, unless you are blind or extremely near -sighted and without your glasses, you can actually peer through the mesh and see the bottom ... which is way, way, way more than a mere 6-8 feet below your feet. At this point, I decided it was best not to look down when we were over these green mesh sections. Since there were no windows to reflect the light, I really wanted to take some photos. Had there been a safety bar, I would have taken tonnes more. As it was, there was a metal bar behind our necks and heads and I wrapped one arm around that while I fiddled with the camera settings in preparation for taking some photos. To take photos of the scenic mountain side view, I had to twist and contort into some very uncomfortable positions. These chairlifts are made of solid plastic mold and there is no give, forcing me to relent to a briefer picture-taking period than I would have liked. Also, the slightest movement on the lifts, rocks the chair. And these seemingly tiny movements are actually quite amplified when you are the other person sitting still in the chair. To make my partner complaints stop, I had to stop taking photos. There are giant signs all the way down telling you not to rock the chairlift. I took some poor shots initially, as the chairlift speed is surprisingly faster than I had thought. But once I compensated for that, I was happy enough to come up with this shot, which occurred over a particularly steep portion of the ride.
 Before reaching the bottom, there is a booth setup with a large camera and a photographer, who asks if you want a photo. We decided to go for it since there was no other way we would get a photo with the two us on the lift. It cost about 600 yen and it's a bit kitschy but it was a nice enough photo of us. Once you reach the bottom and you exit the ride, you can see the booth where you pick up your souvenir photo of yourselves. Around the corner from that is a pedestrian tourist street with many shops selling omiyage, and a few restaurants. I decided to buy some Mount Takao maple okashi (maple flavoured cookies made with the maple trees of Mt. Takao). I think it was about 400 yen. Next time, I'll skip it. I can taste the hint of maple, but it tastes nothing like the memory I have of the delicious maple syrup or maple sugar products from my native Eastern Ontario maple farms or from the Quebec maple farms either. There is also a hint of some kind of medicine-like taste. Like something you get from the dentist. Anyway, I've had them by themselves and later with tea and another time with coffee. Nothing seems to go well with these biscuits. In case you're wondering what sweets not to buy, they look like white sugar glazed fortune cookies that came out warped.
We finished the day at the Italian restaurant attached to the station. They had cheeseless pizza for me and pasta for my husband. The pear tart was to die for. My husband skipped the gelato although it did look scrumptious. We both had the drink bar, despite the restaurant serving alcoholic beverages. The drink bar option allowed us to have a drink with the meal, and a coffee and tea with the pear tart. Lunch for the two of us came to about 4000 yen. Which is pretty decent for the quality of food and the touristy area. The inside of the restaurant actually felt quite spacious.
I loved this short half day hiking trip. We will definitely be back to try another hiking trail. If you're interested in going, I have put some access information below. There are more ways to get there, so you may want to check online if you live west or north of the Tokyo 23 ku area.
ACCESS: Transfer at Shinjuku.
Option 1: You can take the Chuo line and switch at Takao station to the Takao local line to arrive at TAKAOSANGUCHI which takes you right to the foot of the mountain. Costs about 770 yen without the portion price to get to Shinjuku.
Option 2: Take the KEIO line. The special express line comes every 10 minutes and will get you there about 25 minutes faster, so it's worth waiting for. This frequency only occurs on the weekend. During the week, the special express runs less frequently. Costs is about 330 yen minus the portion cost to get to Shinjuku. This method also seems to be the fastest way to get to Takaosanguchi. If you are lucky, you won't have to change trains at Takao station.

No comments:
Post a Comment